GenratePress is a great free WordPress theme built performance keeping in the mind. It looks great, loads fast & has good amount of customization options. This is the reason I choose it for this blog. But while setting it up there is no option to add Author Box In GenratePress natively.
But I have seen a few blogs using GenratePress and having Author Box. So I asked Swadhin Bhai from DigitalGyd, How he added it to his blog. He pointed out me to GenratePress Forum. While digging out the forum I found out that Tom (Developer of GenratePress theme) cleared out that there is no native option to add an author box in GenratePress natively nor he has any plan to add such functionalities to the theme in future, as he thinks “ it’s better left as a plugin. It’s more content related than theme-related I think.” You can find the thread here
While I completely disagree with his opinion, I had no option except looking for some other solution for it. Again I am not going to use another plugin just for author box. But here comes hooks(Custom Layout) in Genratepress Pro to into rescue. You can add anything to the theme, like custom HTML, PHP snippet or Shortcode to anywhere you want.
Tom and his team have described how to add an author box in genratepress in 3-4 places in the support forum, again the problem was none of them was schema optimized or looked ugly. So took inspiration of them added schema and added some design changes to make it look good, here is the step how you can do it too.
How to add An Author Box with Gravatar in GeneratePress Pro
These steps will work only if you have GenratePress Pro, if you don’t have a Pro version of it, you should buy it! It’s worth every money 🙂 Or you can skip to here- “Add An Author Box in GeneratePress Free”.
Add A Hook Element
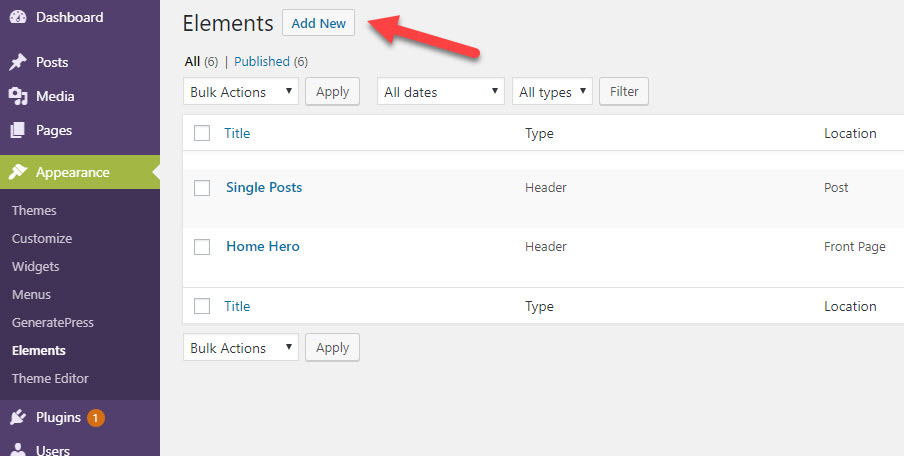
1. Go to appearance, then elements, then click on Add New
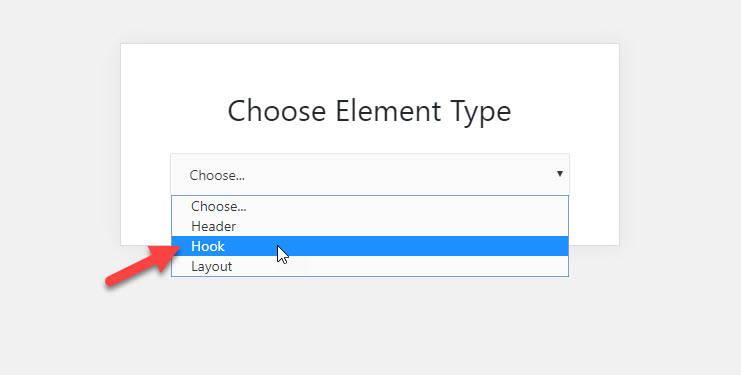
2. Then It will ask you to Choose Element Type, Select Hook from DropDown.
3. Give The Element an appropriate name, such as “Author Box” or something that you can find out it easily in the future. In my case, it is “Author Card”
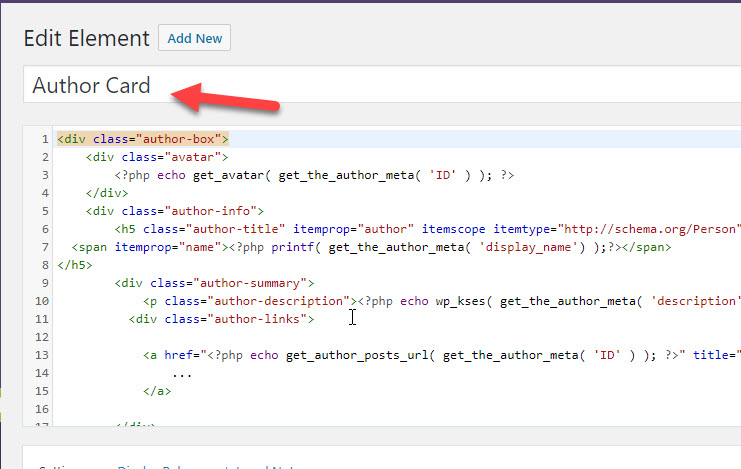
4. Now paste the code below in the editor box.
<div class="author-box">
	<div class="avatar">
		<?php echo get_avatar( get_the_author_meta('user_email'), '96', '' ); ?>
	</div>
	<div class="author-info">
		<h5 class="author-title" itemprop="author" itemscope itemtype="http://schema.org/Person">
			<span itemprop="name"><?php printf( get_the_author_meta( 'display_name') );?></span>
		</h5>
		<div class="author-summary">
			<p class="author-description"><?php echo wp_kses( get_the_author_meta( 'description' ), null ); ?></p></div>
		<div class="author-links">
			<a href="<?php echo get_author_posts_url( get_the_author_meta( 'ID' ) ); ?>" title="Read more">...</a>
		</div>
	</div>
</div>
Special thanks to Daniel for providing PHP code to solve the blurry Gravatar.
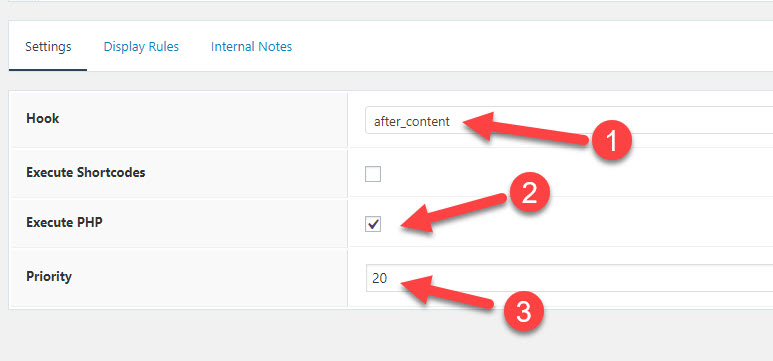
5. Now in the settings below choose “after_content” in the hook options, check to execute PHP option (important) & give priority 10 or 20 depending upon if you have any other elements added to the hook.
6. Now go to “Display Rules”
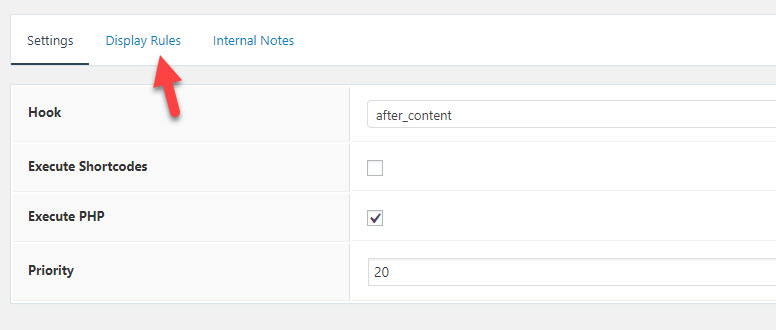
7. In the Locations column select “posts” first then “all post “

8. That’s it we are done, now hit publish to make changes go live.
Adding CSS
There are multiple ways to add CSS to a WordPress site, you can add the CSS into WordPress’s inbuilt customizer’s Additional CSS tab or you can use a child theme to add CSS. In Genratepress forum the will suggest you use SImple CSS Plugin. My preferred method is to use a child theme, but the result will be the same no matter which way you opt for.
Enter the following CSS code and hit publish.
/* Author Box*/
.author-box {
padding: 3%;
    padding-bottom: 10px;
    background-color: #fff;
    border-radius: 7px;
    border-style: solid;
    border-width: 1px;
    border-bottom-width: 4px;
    border-color: #e6dfdf;
    margin-top: 60px;
    font-size: 0.9em;
    display: -webkit-box;
    display: -ms-flexbox;
    display: flex;
    -webkit-box-align: start;
    -ms-flex-align: initial;
    align-items: flex-start;
}
.author-box .avatar {
	height: auto;
	border-radius: 100%;
	margin-right: 30px;
	flex:1;
}
.author-info {
    flex: 4;
}
h5.author-title {
	margin-bottom: 0.1em;
	font-weight: 600;
}
.author-description {
	line-height: 1.6em
}
.author-links a {
	margin-top: -1.5em;
	font-size: 2em;
	line-height: 2em;
	float: left;
}
@media (max-width: 768px) {
	.author-box {
		padding: 20px;
		padding-bottom: 0px;
		margin-top: 100px;
		flex-direction: column;
		text-align: center;
	}
	.author-box .avatar {
		margin-right: 0;
		margin-bottom: 10px;
		width: 100%;
		margin-top: -35px;
	}
	.author-box .avatar img {
		max-width: 100px;
	}
	.author-links a {
		float: none;
		align-self: center;
	}
	.author-description {
		margin-bottom: -1.1em;
	}
}
Now you can head over to your blog post to check out your new author box.
You can play with CSS code to change the look of your author box to match your website’s layout and color combination. Ideally, It should look like this!

You can verify your schema details going Google Structured Data Tool.

How to add An Author Bio Box in GeneratePress Free.
Sadly the method I wrote above won’t work if you don’t have a Premium version of GenratePress, so we have to depend upon an external plugin to achieve the same. There are lots of plugin for the same in WP Repo, but most of them are bolted and few ask for the premium version for such small thing. You can use any of them but I recommend using Social Pug: Author Box. It is very lightweight and does the most importantly does the job of adding an Author Box in GeneratePress free version.
Don’t get fooled by its surprisingly low amount of installs. It is one of the best you can find wp repo in same category.
Setting up Social Pug: Author Box For GenerateaPress
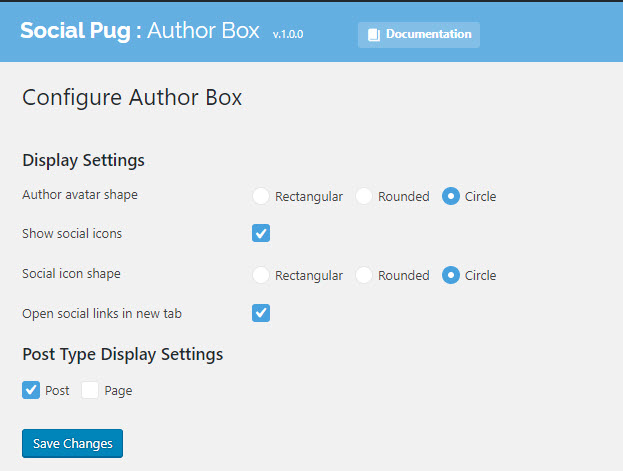
Settings in the plugin is very simple and straight forward. To set it up go to Settings in the sidebar then Social Pug Author Box.
It asks about Author Avtar Shape, option to show or hide social media icons & shape of icons, which are pretty much self-explanatory. In the next step, it asks for where to display post, page or both. I opted for post only, you can choose it according to your needs!
This is how my setting looks like.
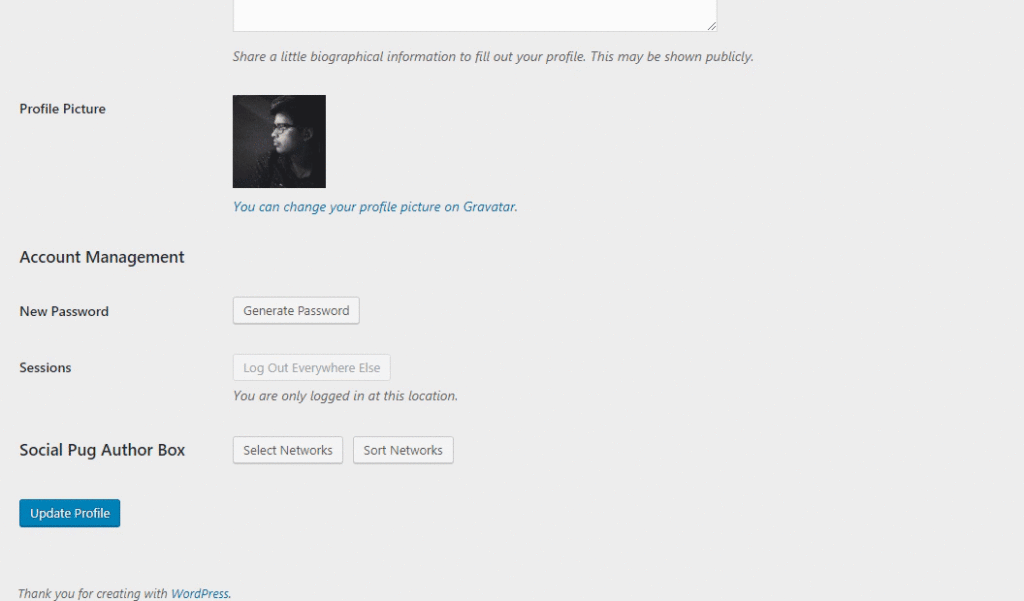
To add social media links to your profile, Go to users then your profile, now scroll down till you see – “Social Pug Author Box”. Then choose the social media links you want to display below your profile. Then hit “Update Profile”
You are done now!! Navigate to your blog and see what your new author box looks like.
It should look like this.

Conclusion
These are two ways using which you can add author bio box in Generatepress pro and free. If something doesn’t work or you face any problem add this to your site. Drop a comment below I will try my best to help you out.


26 comments
Amar
This post was really helpful for me tq for this great post.
enbc
Can you share the tutorial to make your post meta?
With your image, your name, last updated on and share button?
Thanks.
Jswsm
Thanks for the valuable article that clear my confusion about this topic.
Hasib Ahmed
Please share this site author Box code please
Gulshankumar thakur
Nice information thanks for sharing
Free Recharge Tricks
nice post.
Arnab Mohapatra
Thank you!
Arnab Mohapatra
Second reply test
Alvaro
Hi! It’s very useful. I went through the code option into Generate Press. But I want to know two things:
1. If you have more than one author (using coauthors) the box only show the first. I have incorporated some code provided by Generate Press to show in meta info the two authors, I don’t know if it helps (see it below)
2. Is possible to show social media icons?
add_filter( ‘generate_post_author_output’, ‘tu_co_author_plus’ );
function tu_co_author_plus( $author ) {
if ( function_exists( ‘coauthors_posts_links’ ) ) {
return ‘ Por ‘ . coauthors_posts_links( null, null, null, null, false );
}
return $author;
}
suvam biswas
actually i was using star box before this. Thank you so much for this post. It will really help my site to add author box without a plugin.
Arnab Mohapatra
Thank you suvam!
Blessing Olarewaju
WOw! Thank you for this tutorial.
I was able to add an author box to my Generatepress theme using the first method. I love that you made the process easy with the pictures.
Kudos
Syams
Hi Arnab, do you tell us how to add table of content like this blog?
Onyekachi
Hello Arnab, I used this code and the author box is showing fine on my website but the avatar isn’t coming up. What could be the problem?
Arnab Mohapatra
There was a bit of problem in PHP code.
I have updated it. Try again.
Sayan Dey
It’s work fine but It can’t fetch my avatar image. Would you help me?
Arnab Mohapatra
Hi Sayan,
Updated the code please check again.
Thanks
Daniel
Hi Arnab,
thank you for providing this code and CSS!
But, I’ve noticed, that the Gravatar image looks a bit “blurry” when I use the size of 250px (from the CSS code). The default image size of the Gravatar is only 96px – I guess because of the default get_avatar function of WordPress?
The URL looks like
https://secure.gravatar.com/avatar/xxxx?s=96&d=mm&r=g
I’ve modify your PHP code like this:
Now, the fetched Gravatar image is 250px, which looks better.
Is this modification correct and maybe this is useful for other users?
Happy new year to you!
Daniel
Arnab Mohapatra
Hey Daniel,
Yes, I am fetching default wp function, That’s why it is blurry. Can you provide me the updated code, I will update the guide.
Happy New Year to you too ????????
Thanks
Arnab
Daniel
Hi Arnab,
I’ve changed the get_avatar code like this:
echo get_avatar( get_the_author_meta( ‘ID’ ), 250 );
In the web browser developer tool I can then see that a gravatar image of 250px is loaded (also a 500px image for retina screens with srcset).
I guess, this should work.
Have a nice weekend!
Daniel
Arnab Mohapatra
Thanks, Updated the code.
James
Thank you very much. Finally, a solution that works perfectly.
Arnab Mohapatra
Glad that it helped you 🙂
Daniel
Thanks Arnab!
Looks really great on mobile and desktop! The CSS is really useful…
Arnab Mohapatra
Glad to hear that, It helped.
Hasib Ahmed
This site author Box code please share